...
- Start Eclipse; it will request a folder name. Our practice is to use a folder name that makes it clear this is an Eclipse workspace. For example:
- cdacontentevaluation-workspace
- Edit the Git configuration.
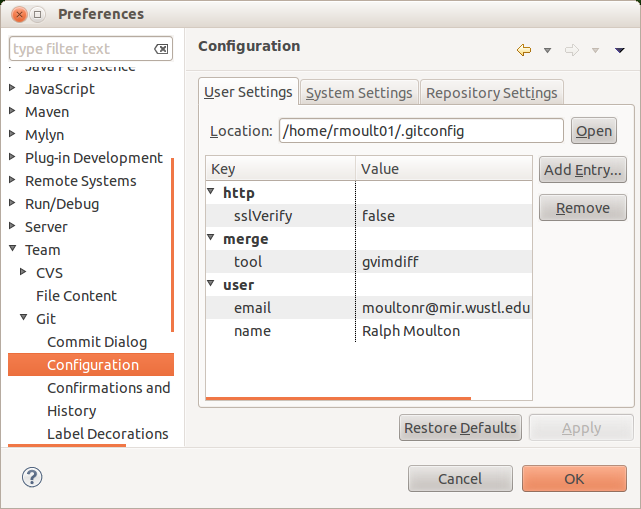
- From the Eclipse menu bar, select View > Preferences.
- In the Preferences dialog left side menu tree, open Team > Git > Configuration.
- In the Configuration dialog, select the User Settings tab (may already be selected).
Edit the key-value pairs to look like this (your name and email, of course):
- Close the Welcome window and open the Git Repository Exploring perspective.
- Click on the Open Perspective icon:
 which is in the upper right area of the screen.
 In the Open Perspective dialog, select Git Repository Exploring and Click OK.
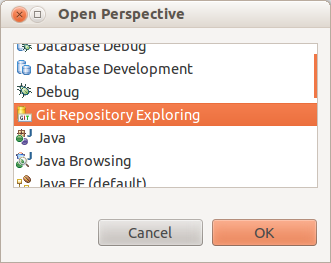
- Click on the Open Perspective icon:
The left panel of the Git Repository Exploring perspective contains the Git Repositories tab. Since this is a new project and has no identified Git Repositories, the following links will appear in the middle of the tab:

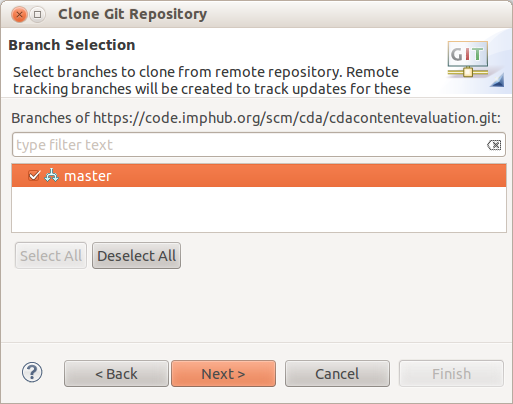
Click on "Clone a Git repository" link, which will start the wizard. Fill in the first dialog as shown, using your own imphub login and password, and click Next

- In the Branch Selection dialog, select the master branch and click Next.
- In the Local Destination dialog,
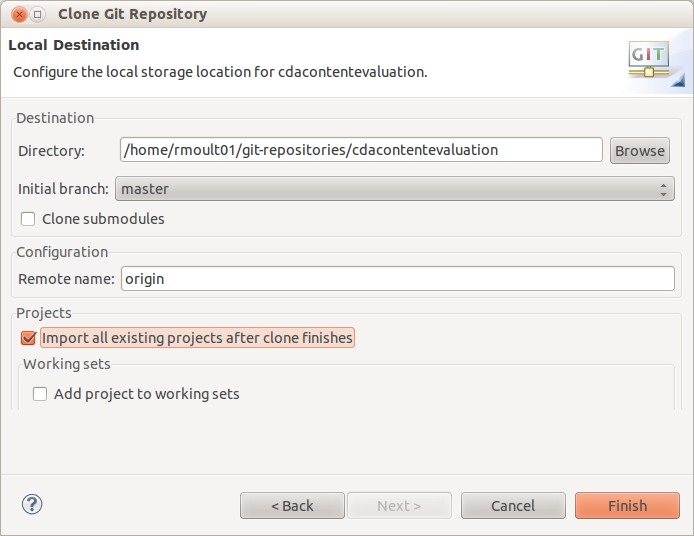 The next form indicates where you will place your git repository.
- Enter the directory where your local Git repository will be placed. This should not be in your workspace.
- Check: Import all existing projects after clone finishes.
- Click Finish
- The wizard will clone the Git repository to your local system and import the CDA Content Evaluation project to Eclipse.
- Switch to the Java EE perspective.
- Update Eclipse with the project maven configuration.
- In the Project Explorer tab, right click on the CDAContentEvaluation line.
- On the context menu, select Maven > Update Project...
- In the Update Maven Project, make sure you select the one project (check box is not enough), and the click OK.
- Right click on the CDAContentEvaluation line
- Run as Maven build (not Maven build ...)
- Set goals: clean package install
- Run the application
- This should build several war files in the target folder. If this fails, it might be due to a non-existent folder. In Eclipse, make sure the folder "src/profiles/dev" exists. The dev folder should be parallel to the folders eu and na.
Attach Tomcat to Eclipse
...